At Charlotte's House

  • About
    • PRESS
    • TELEVISION
    • BLOGGERS HEART HABITAT
    • DISCLOSURE & PRIVACY POLICY
  • HOME TOUR
    • CURRENT HOUSE
    • FIRST HOUSE
    • ROOM REVEALS
    • SEASONAL HOME TOURS
  • GALLERY
    • FLEA MARKET & THRIFT SCORES
    • CRAFTS
    • FURNITURE FIXER UPPERS
    • WALL DECOR
    • OTHER STUFF…
  • PODCAST
    • PODCAST EPISODES
  • SHOP
    • SHOP INSTAGRAM
  • CONTACT
    • SPONSOR/ ADVERTISE
    • SUBSCRIBE

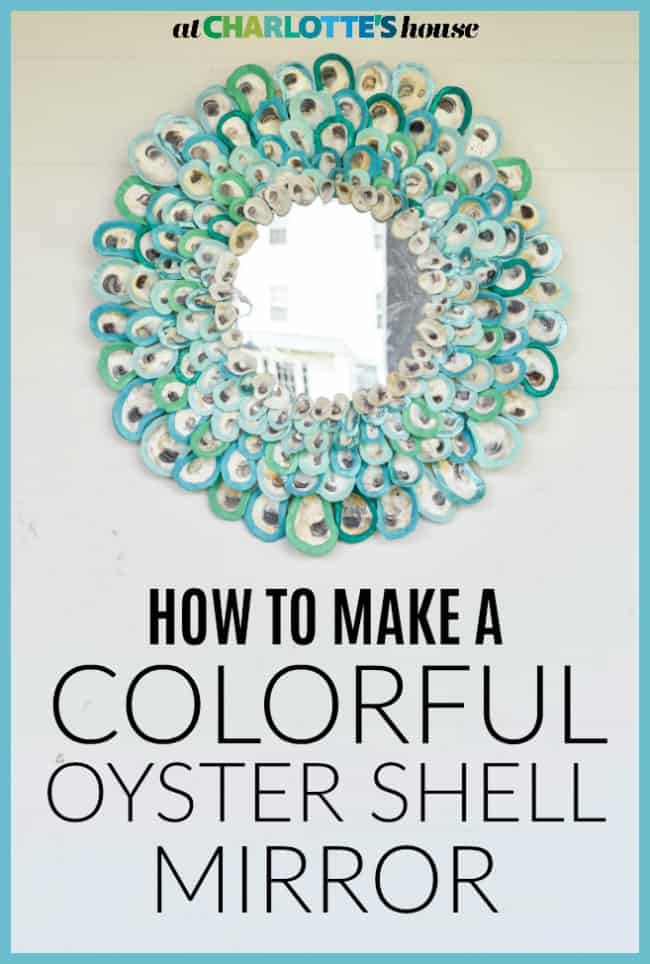
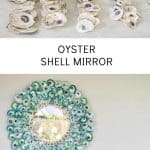
How To Make A Colorful Oyster Shell Mirror

Psssst... this post *might* contain affiliate links: see my disclosure here.

August 16, 2018

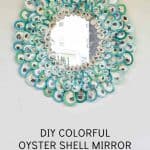
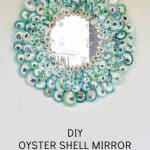
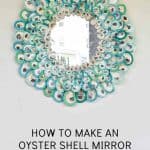
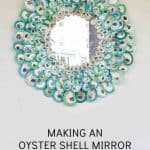
How to Make an Oyster Shell Mirror

colorful oyster shell mirror

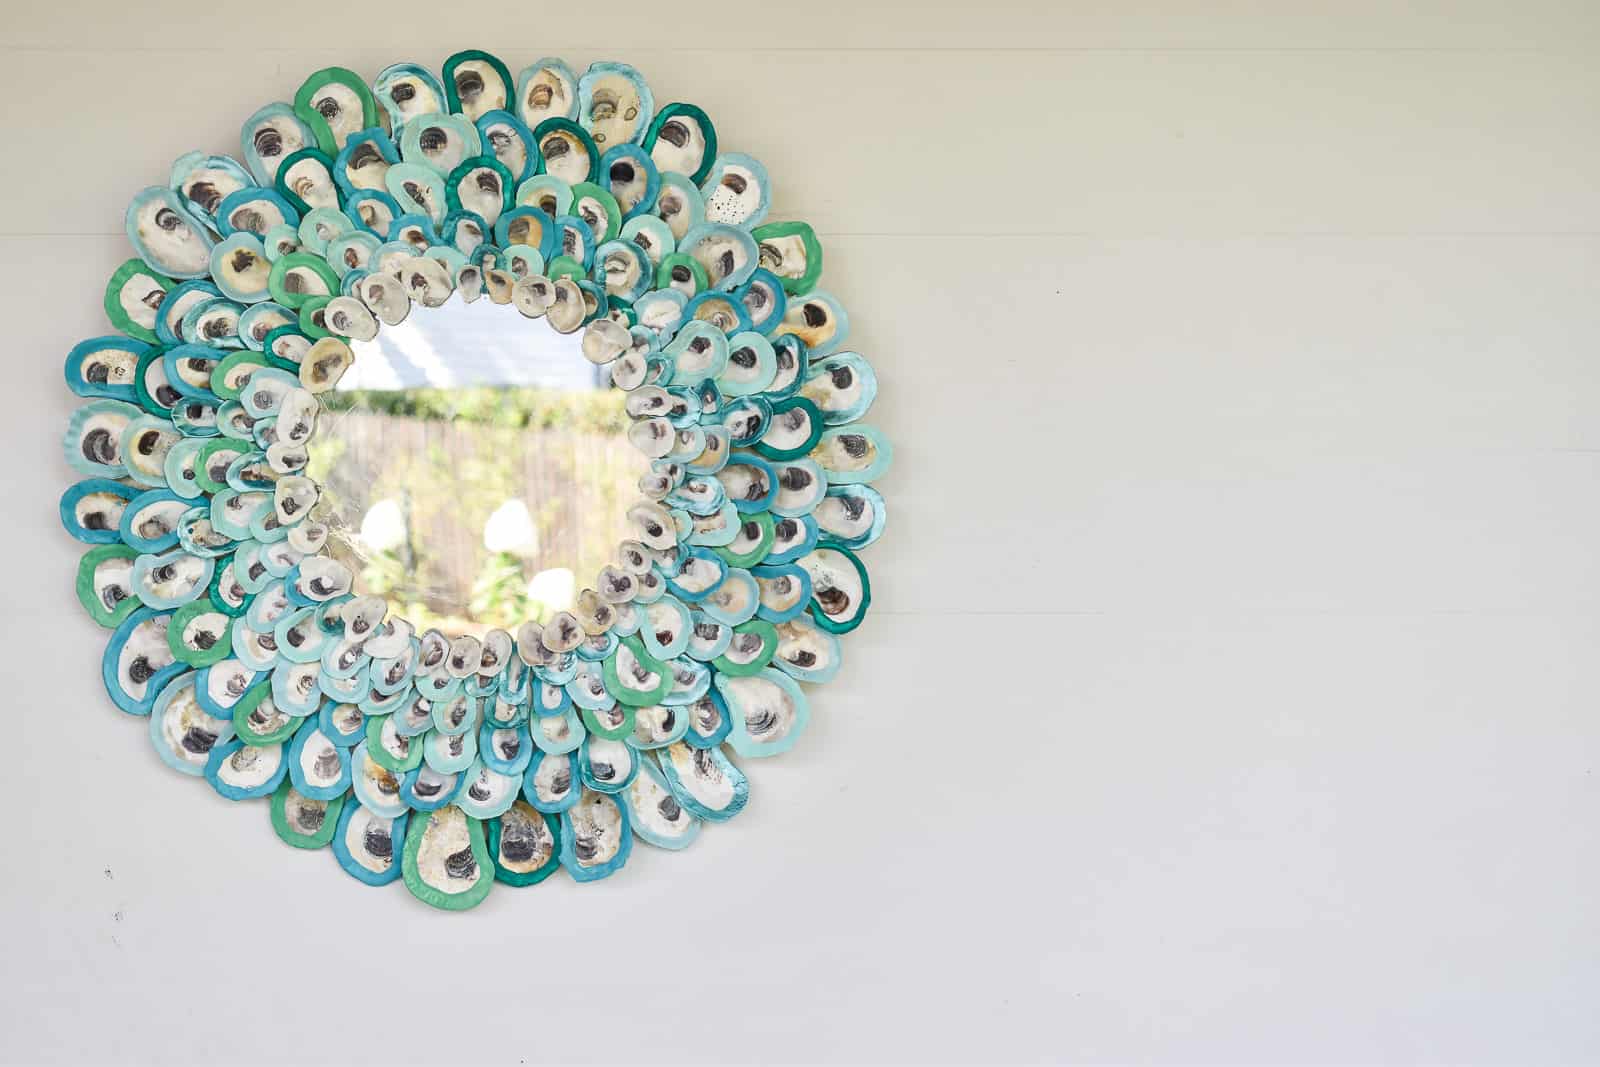
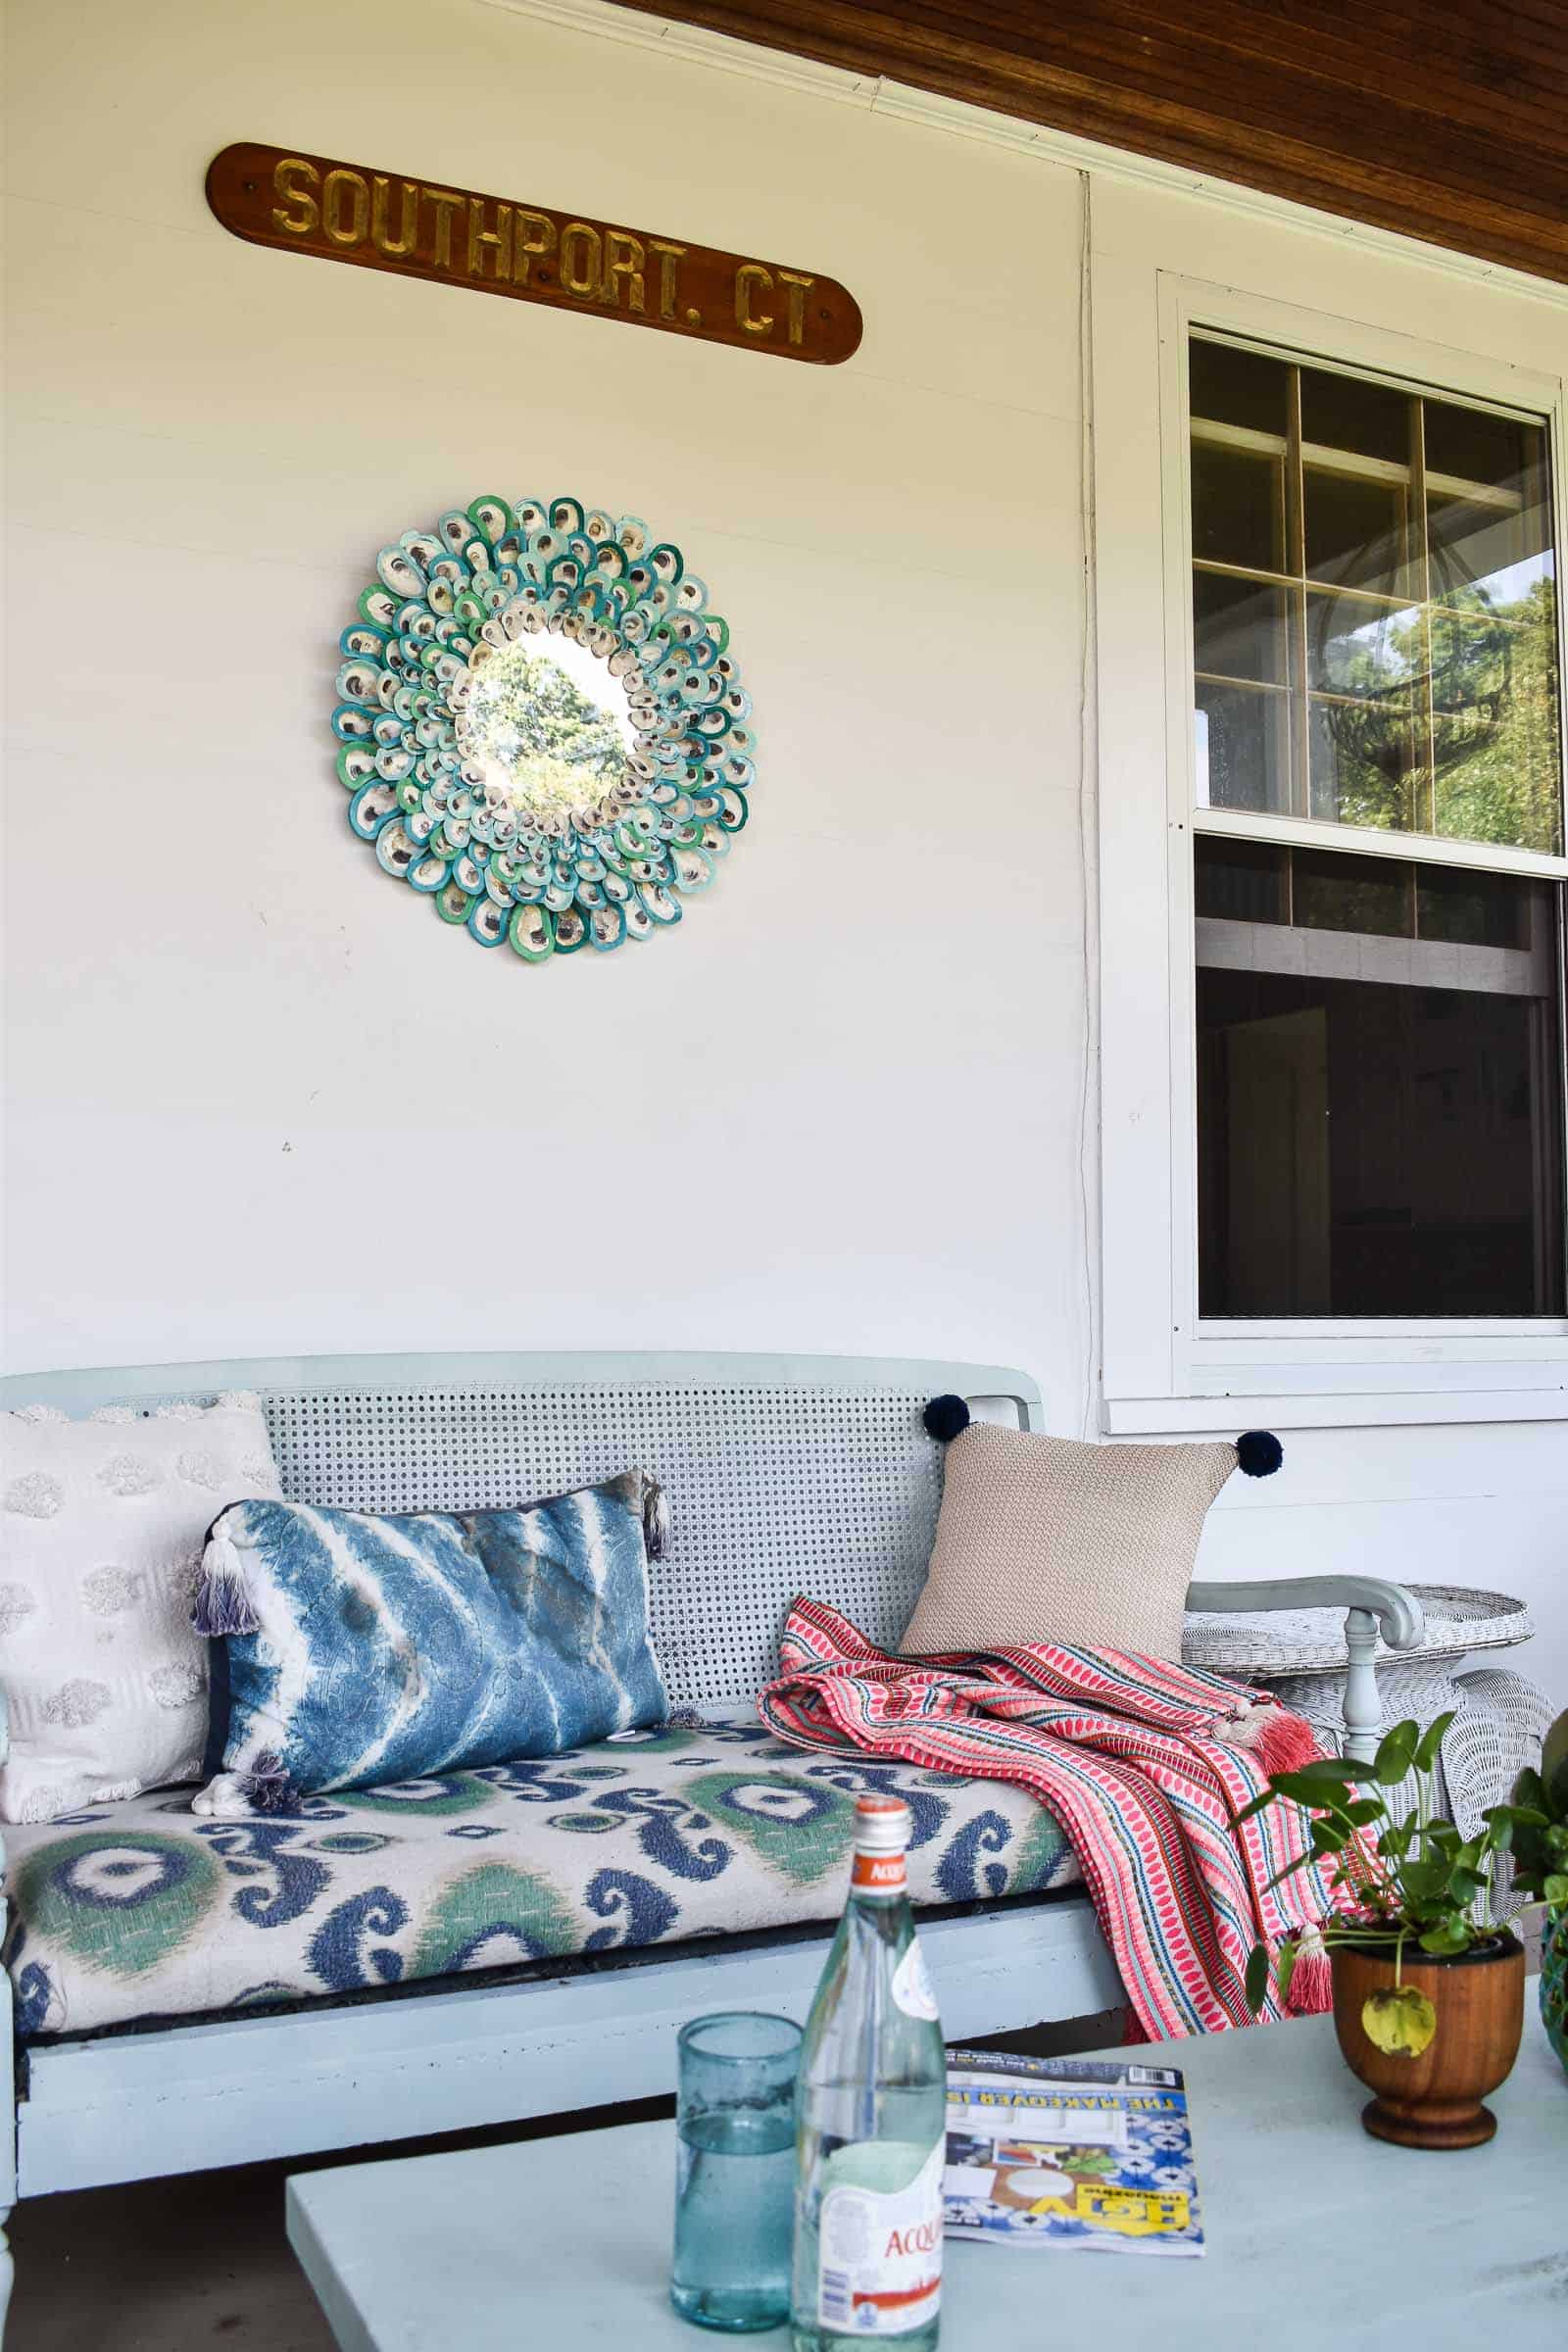
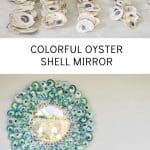
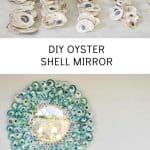
Two weeks ago, we went to the beach. And all along the beach were these shells. I think they’re oyster shells, but I didn’t really care, because they just looked… like potential. I filled a bucket with them, and brought them home. My style isn’t nautical nor is it neutral, so the first thing I wanted to do was add color! Which is how I ended up with the colorful oyster shell mirror DIY you see above!

Step 1. Add Color

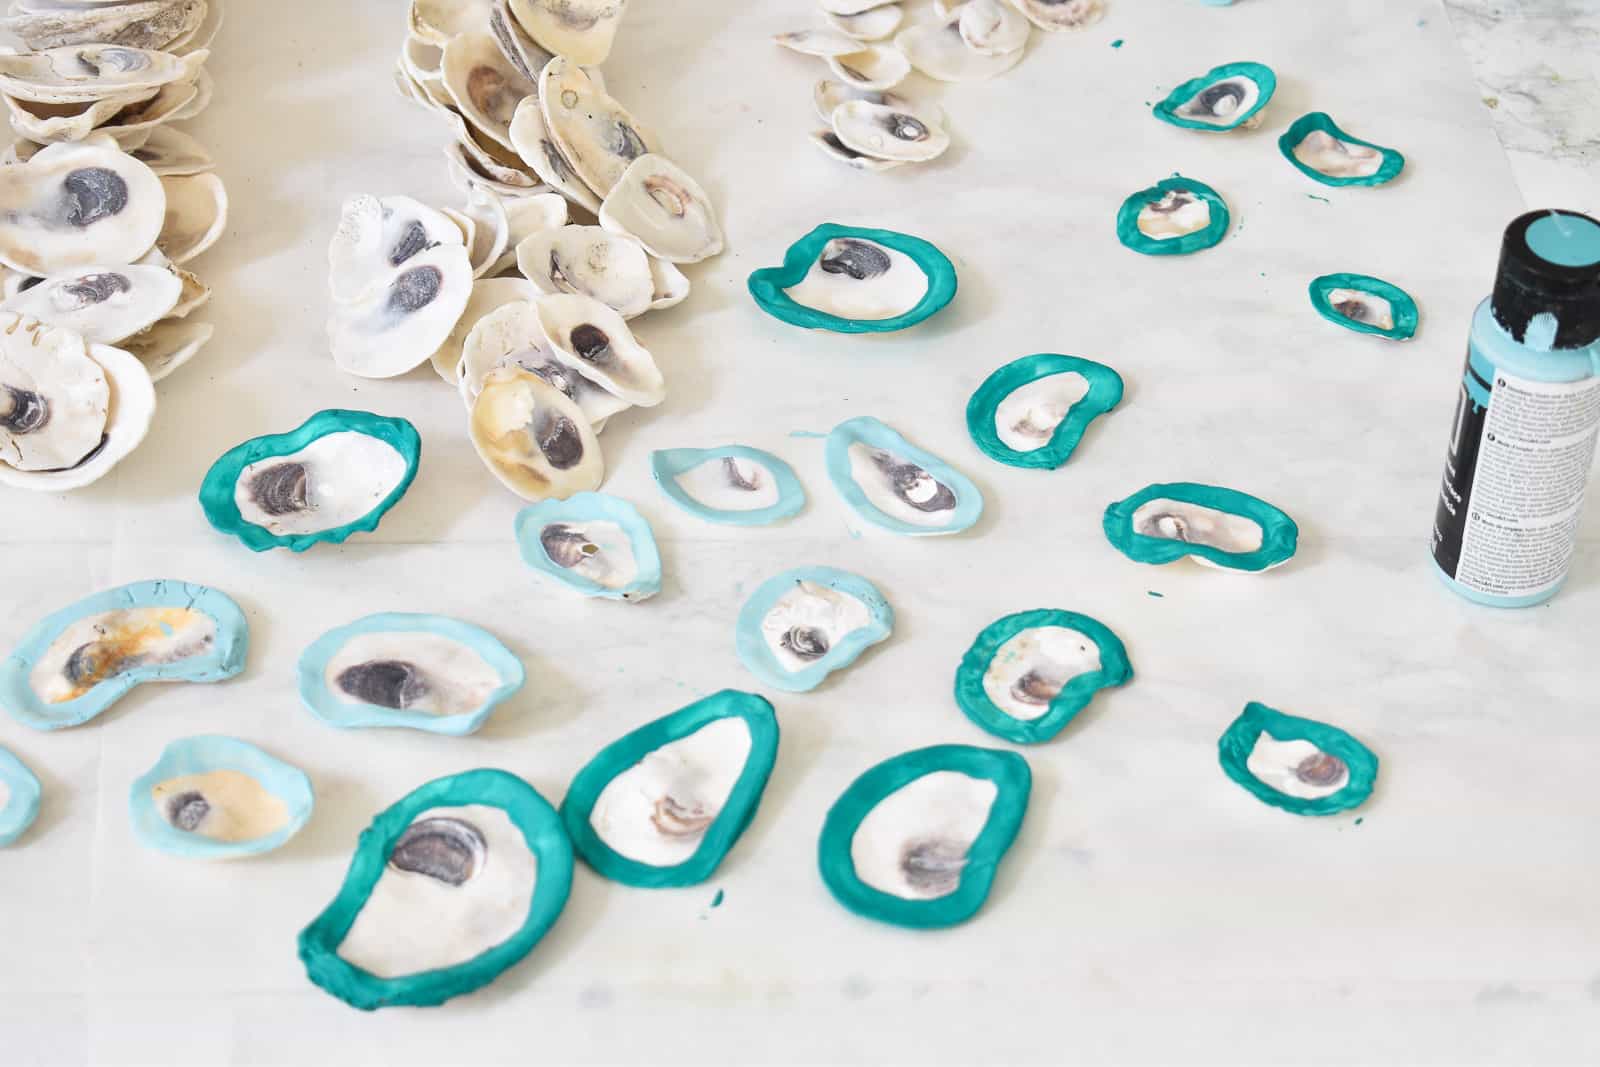
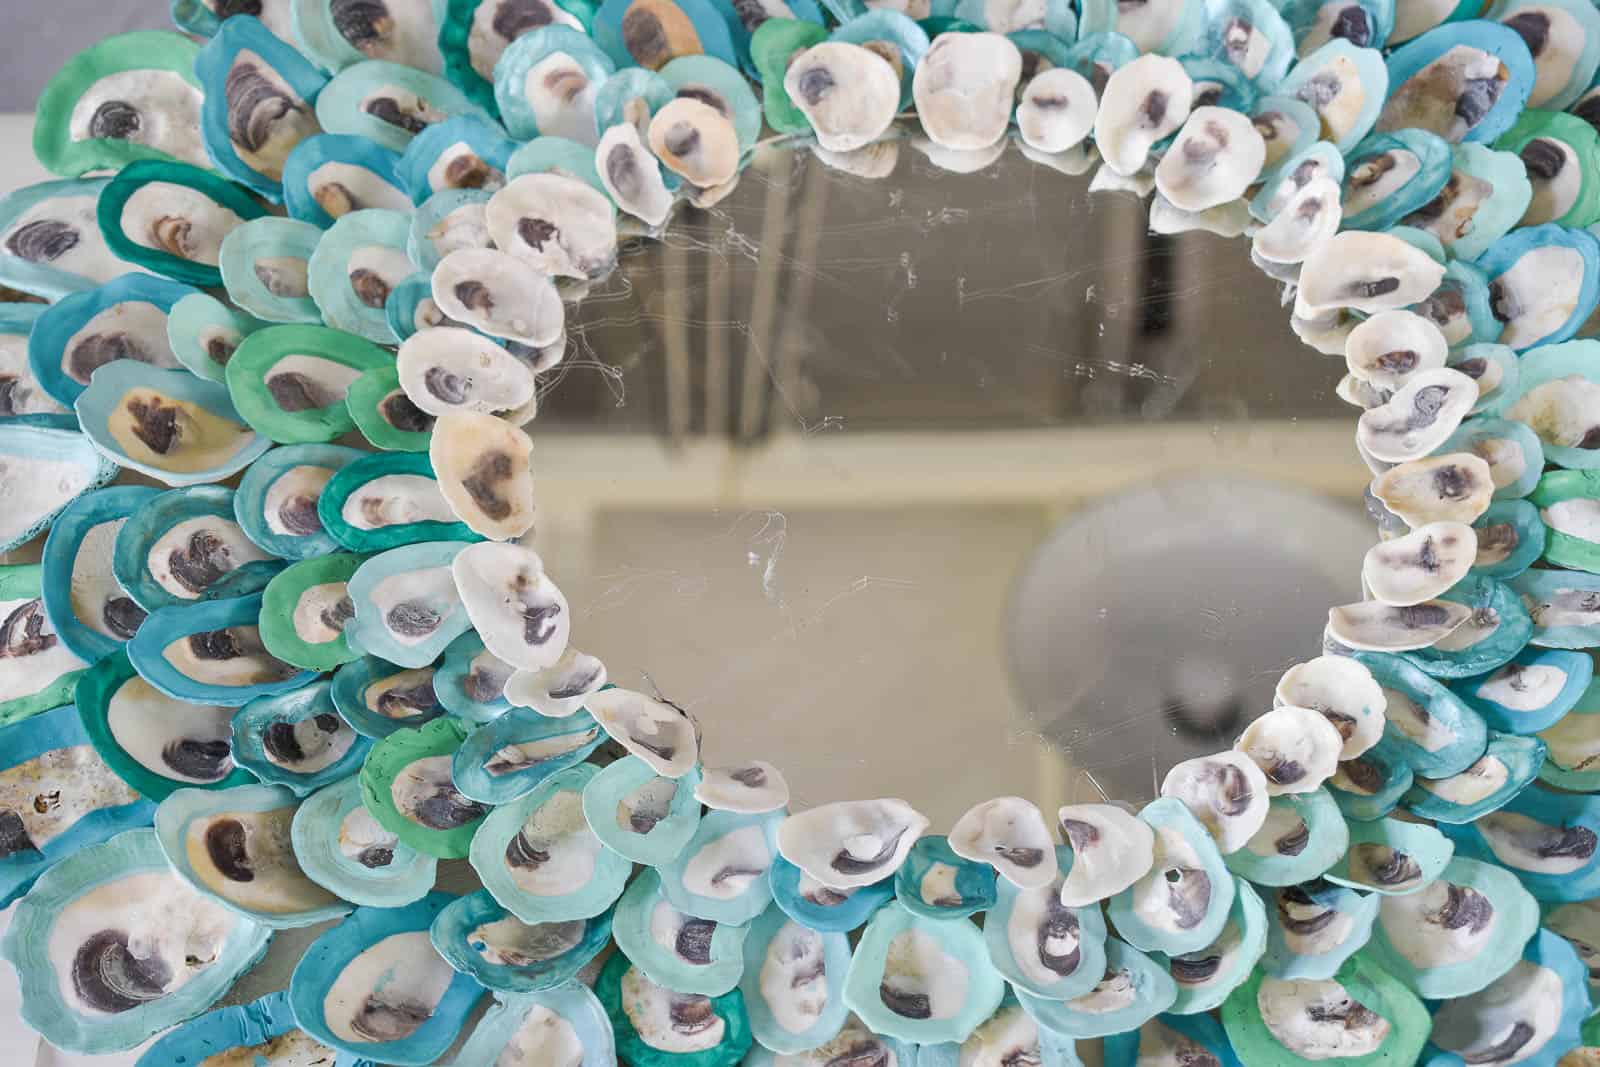
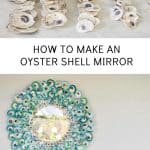
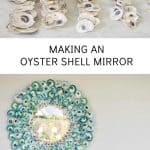
I pulled out my craft paint and selected all the colors I wanted to use: blues and greens. (Spoiler alert- I originally started with a handful of other colors that I ultimately didn’t use: greens and gold.) I started by sorting the shells, and then I used a 1/4 inch basic craft brush and gave each shell a colorful outline and left each shell to dry.

sorting the oyster shells

paint the edges of the shells

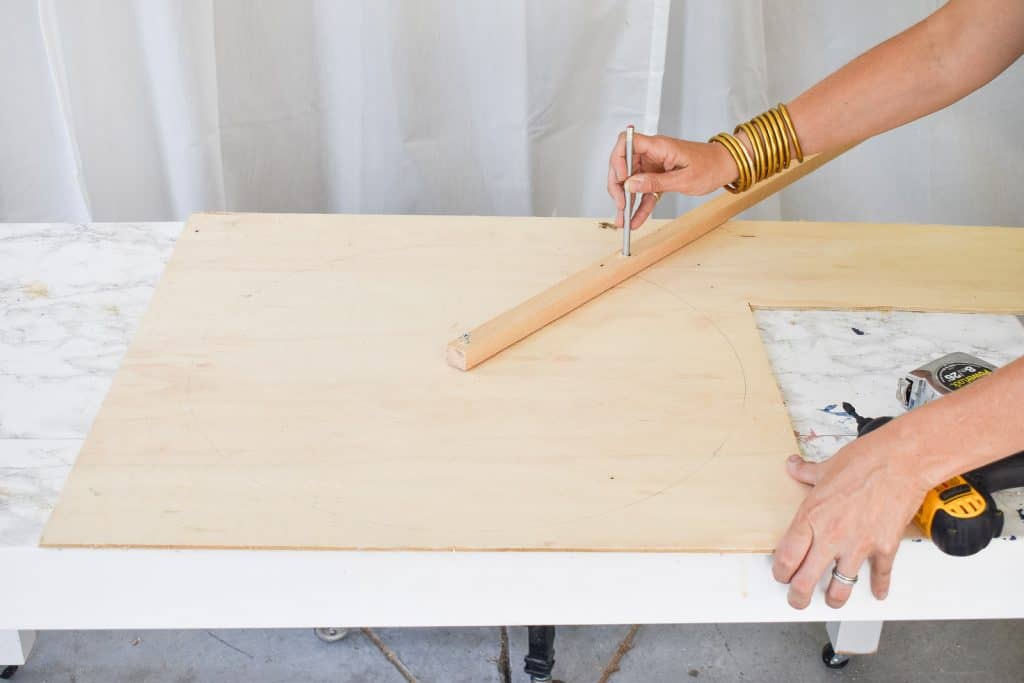
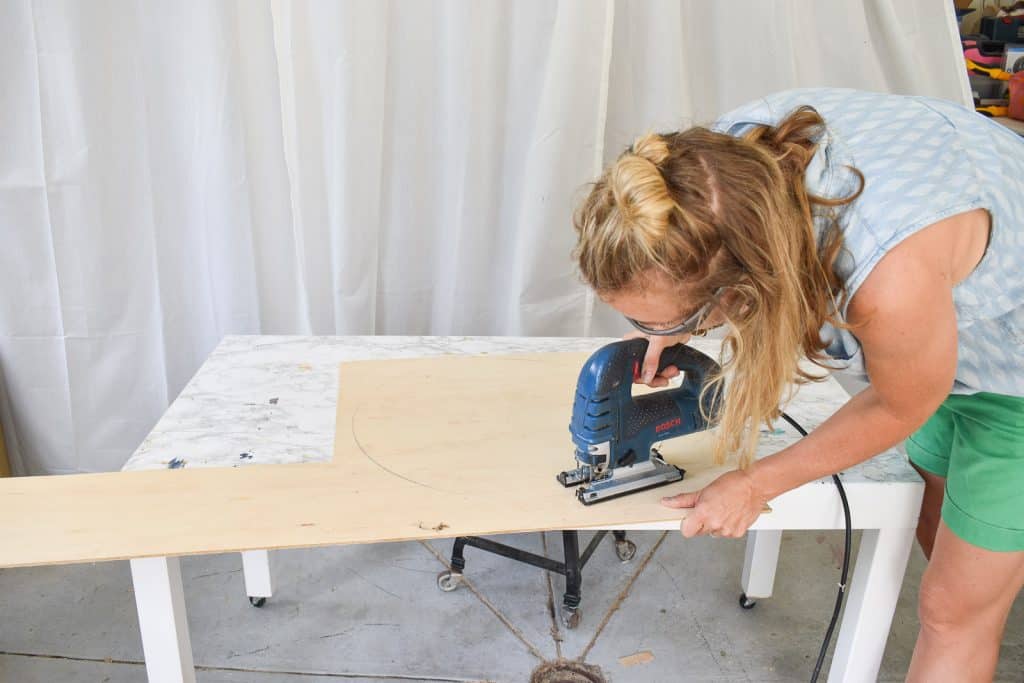
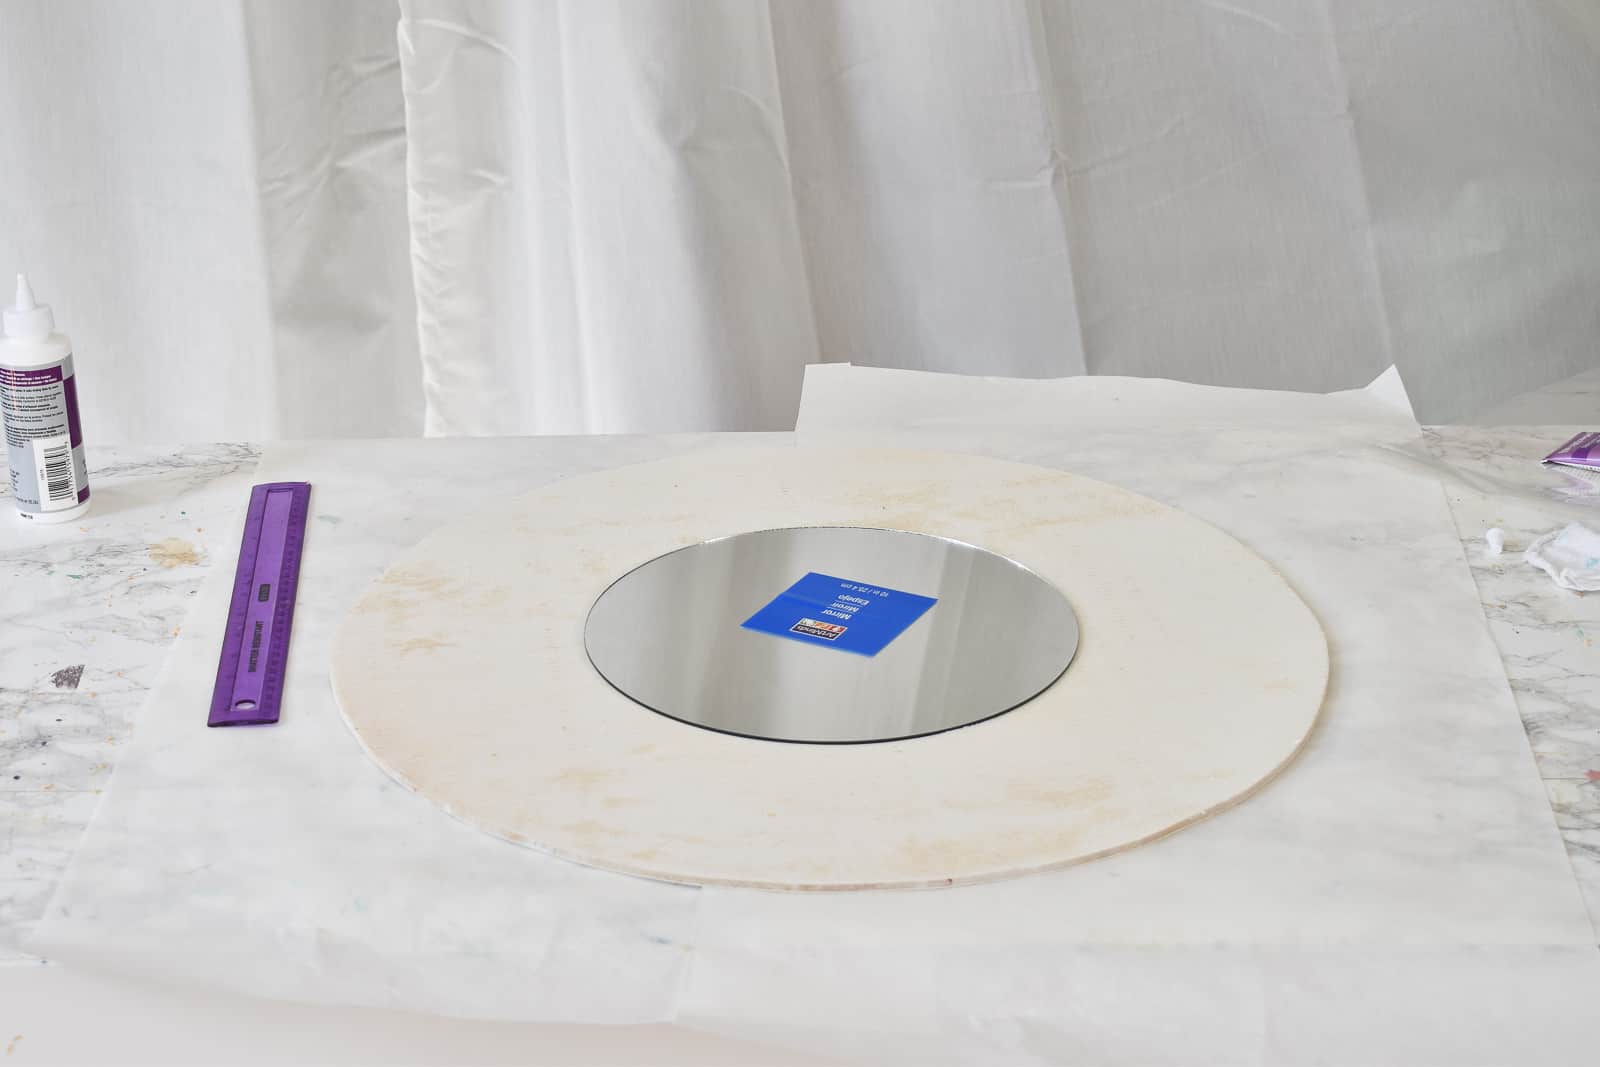
Step 2. Make the Mirror Base

I had some scrap wood, but… this wood is a thin piece of 4×8 plywood from Home Depot that will cost maybe $10. I made a quick compass by grabbing a piece of scrap wood and screwing one end loosely into the plywood to be the center point. I drilled a hole in the other end (10 inches from the center point) large enough for a pencil and then… voila, I was able to draw a perfect 20-inch circle. I cut it out with my jigsaw.

Making a compass out of scrap wood
cut out circle for mirror with jigsaw

Step 3. Prepare the Mirror

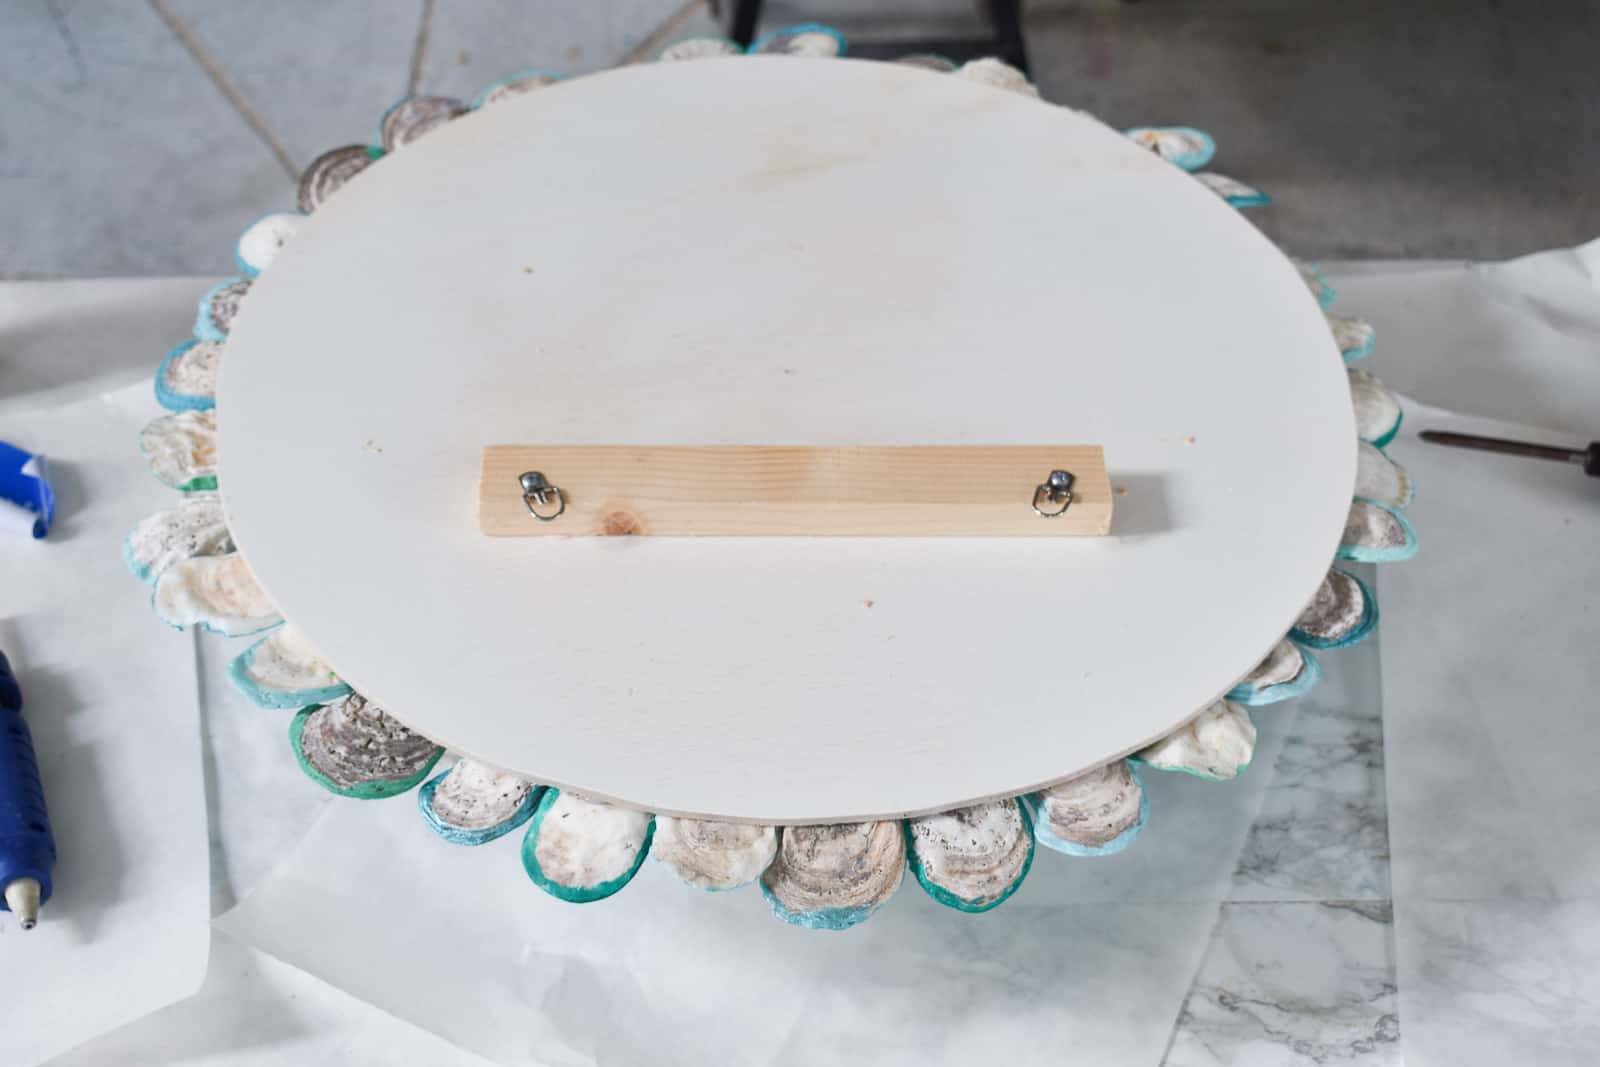
Because the shells are white, I quickly painted the plywood (front and back) white. Then I centered and glued the mirror onto the board with craft glue. I used a 10″ mirror similar to this one (affiliate).

paint the plywood and glue the mirror onto the center

Step 4. Attach the Shells

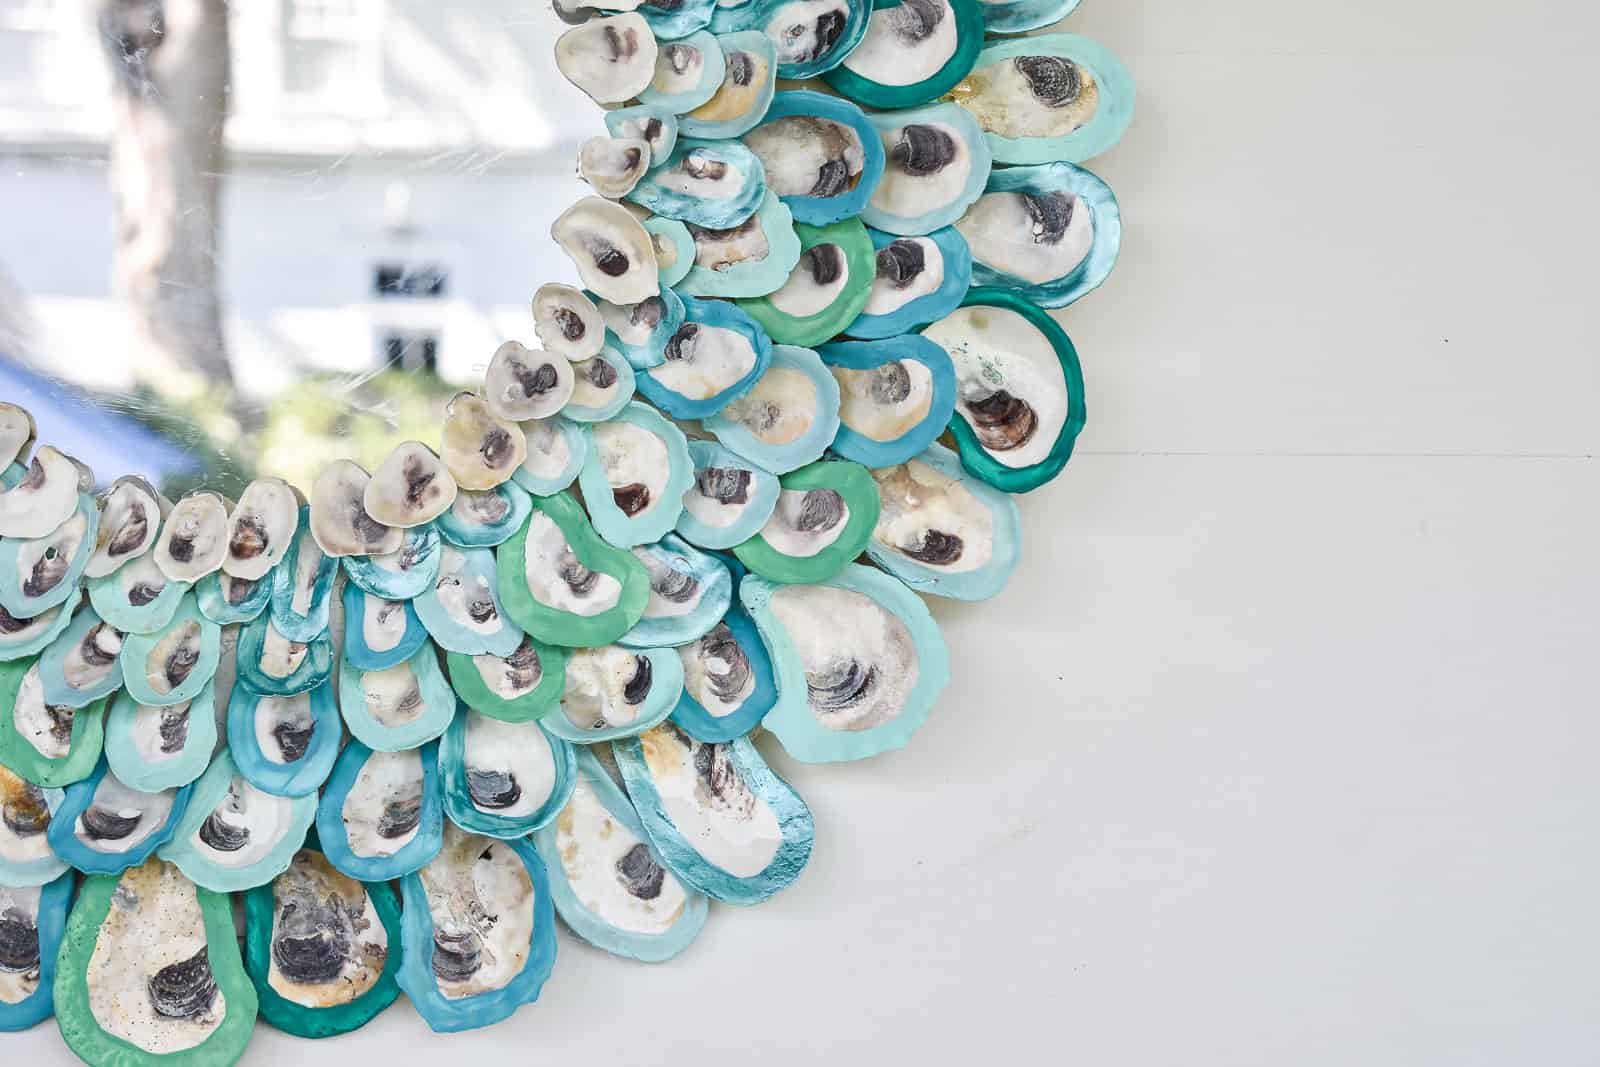
Remember how you sorted all your shells? Your shells should be separated into 4 categories: extra big, big, medium, small. I used a hot glue gun to initially attach the largest shells around the outer edge of the mirror, leaving about 1.5 inches on the plywood, and the rest overhanging. The hot glue gun will allow you to place the shells, but I went back with some craft glue to make sure they were extra secured.

glue the shells around the outside of the plywood

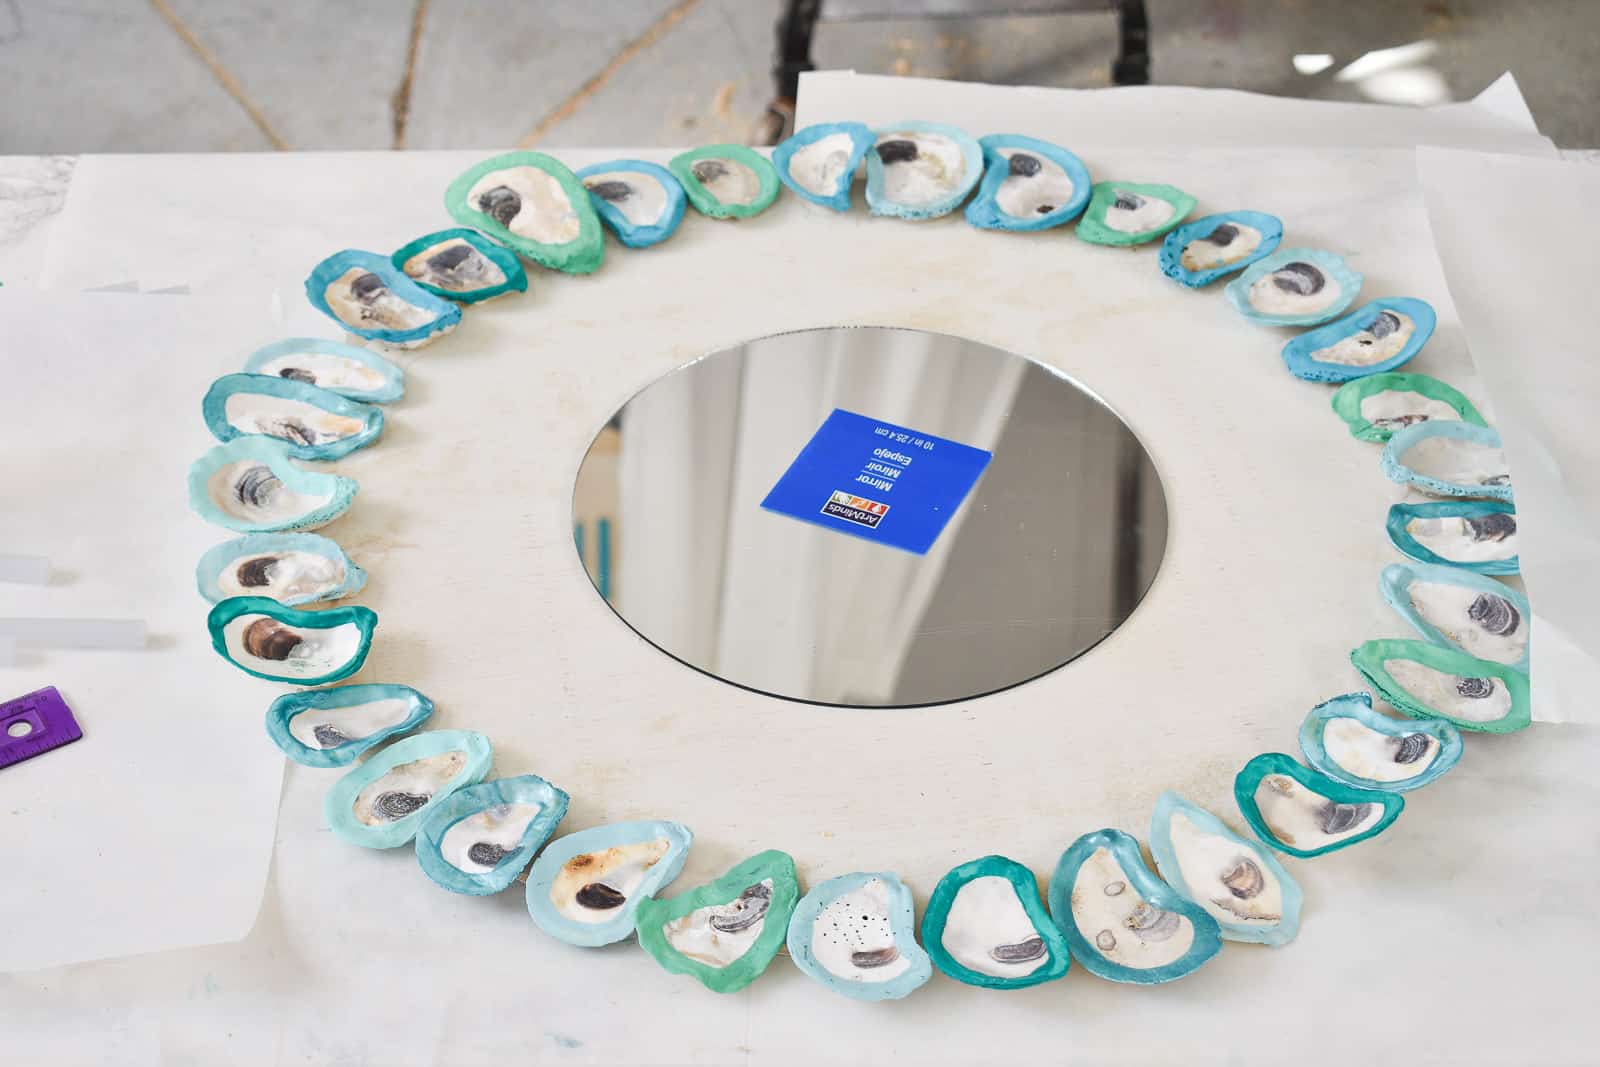
Next you’re going to glue the less big shells just inside that outer ring being careful to alternate shells to cover the seams between the outer ring shells as much as you can.

2nd row of colorful oyster shells

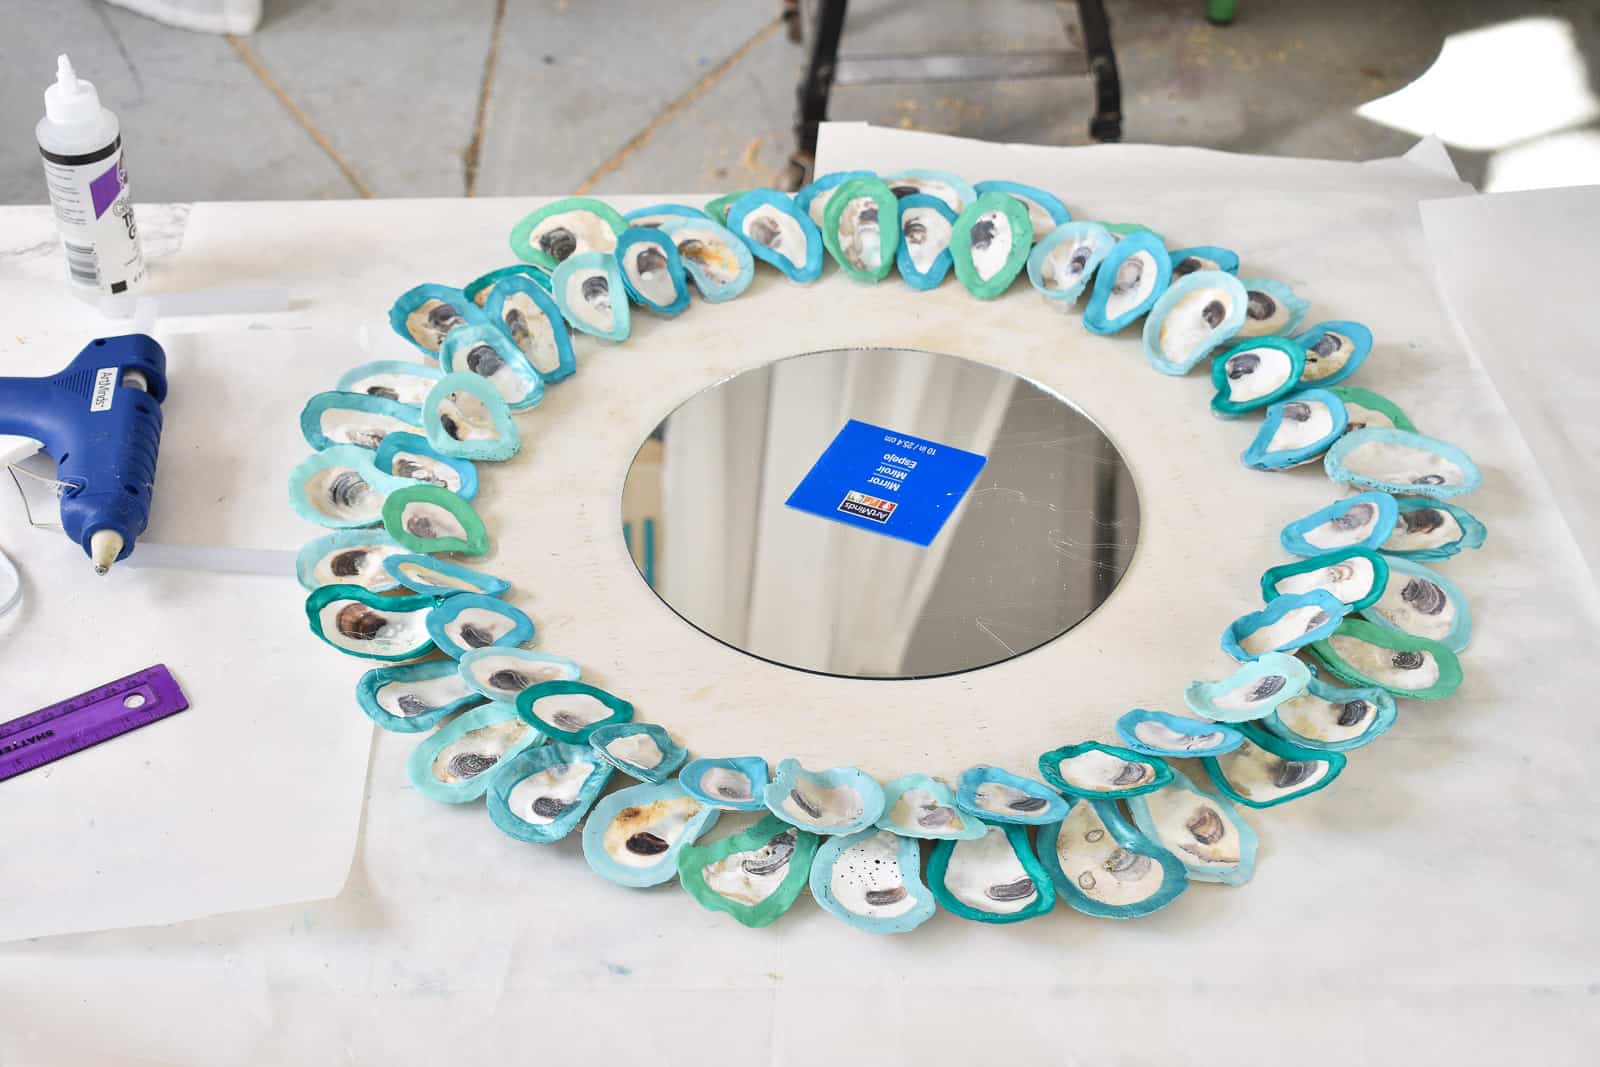
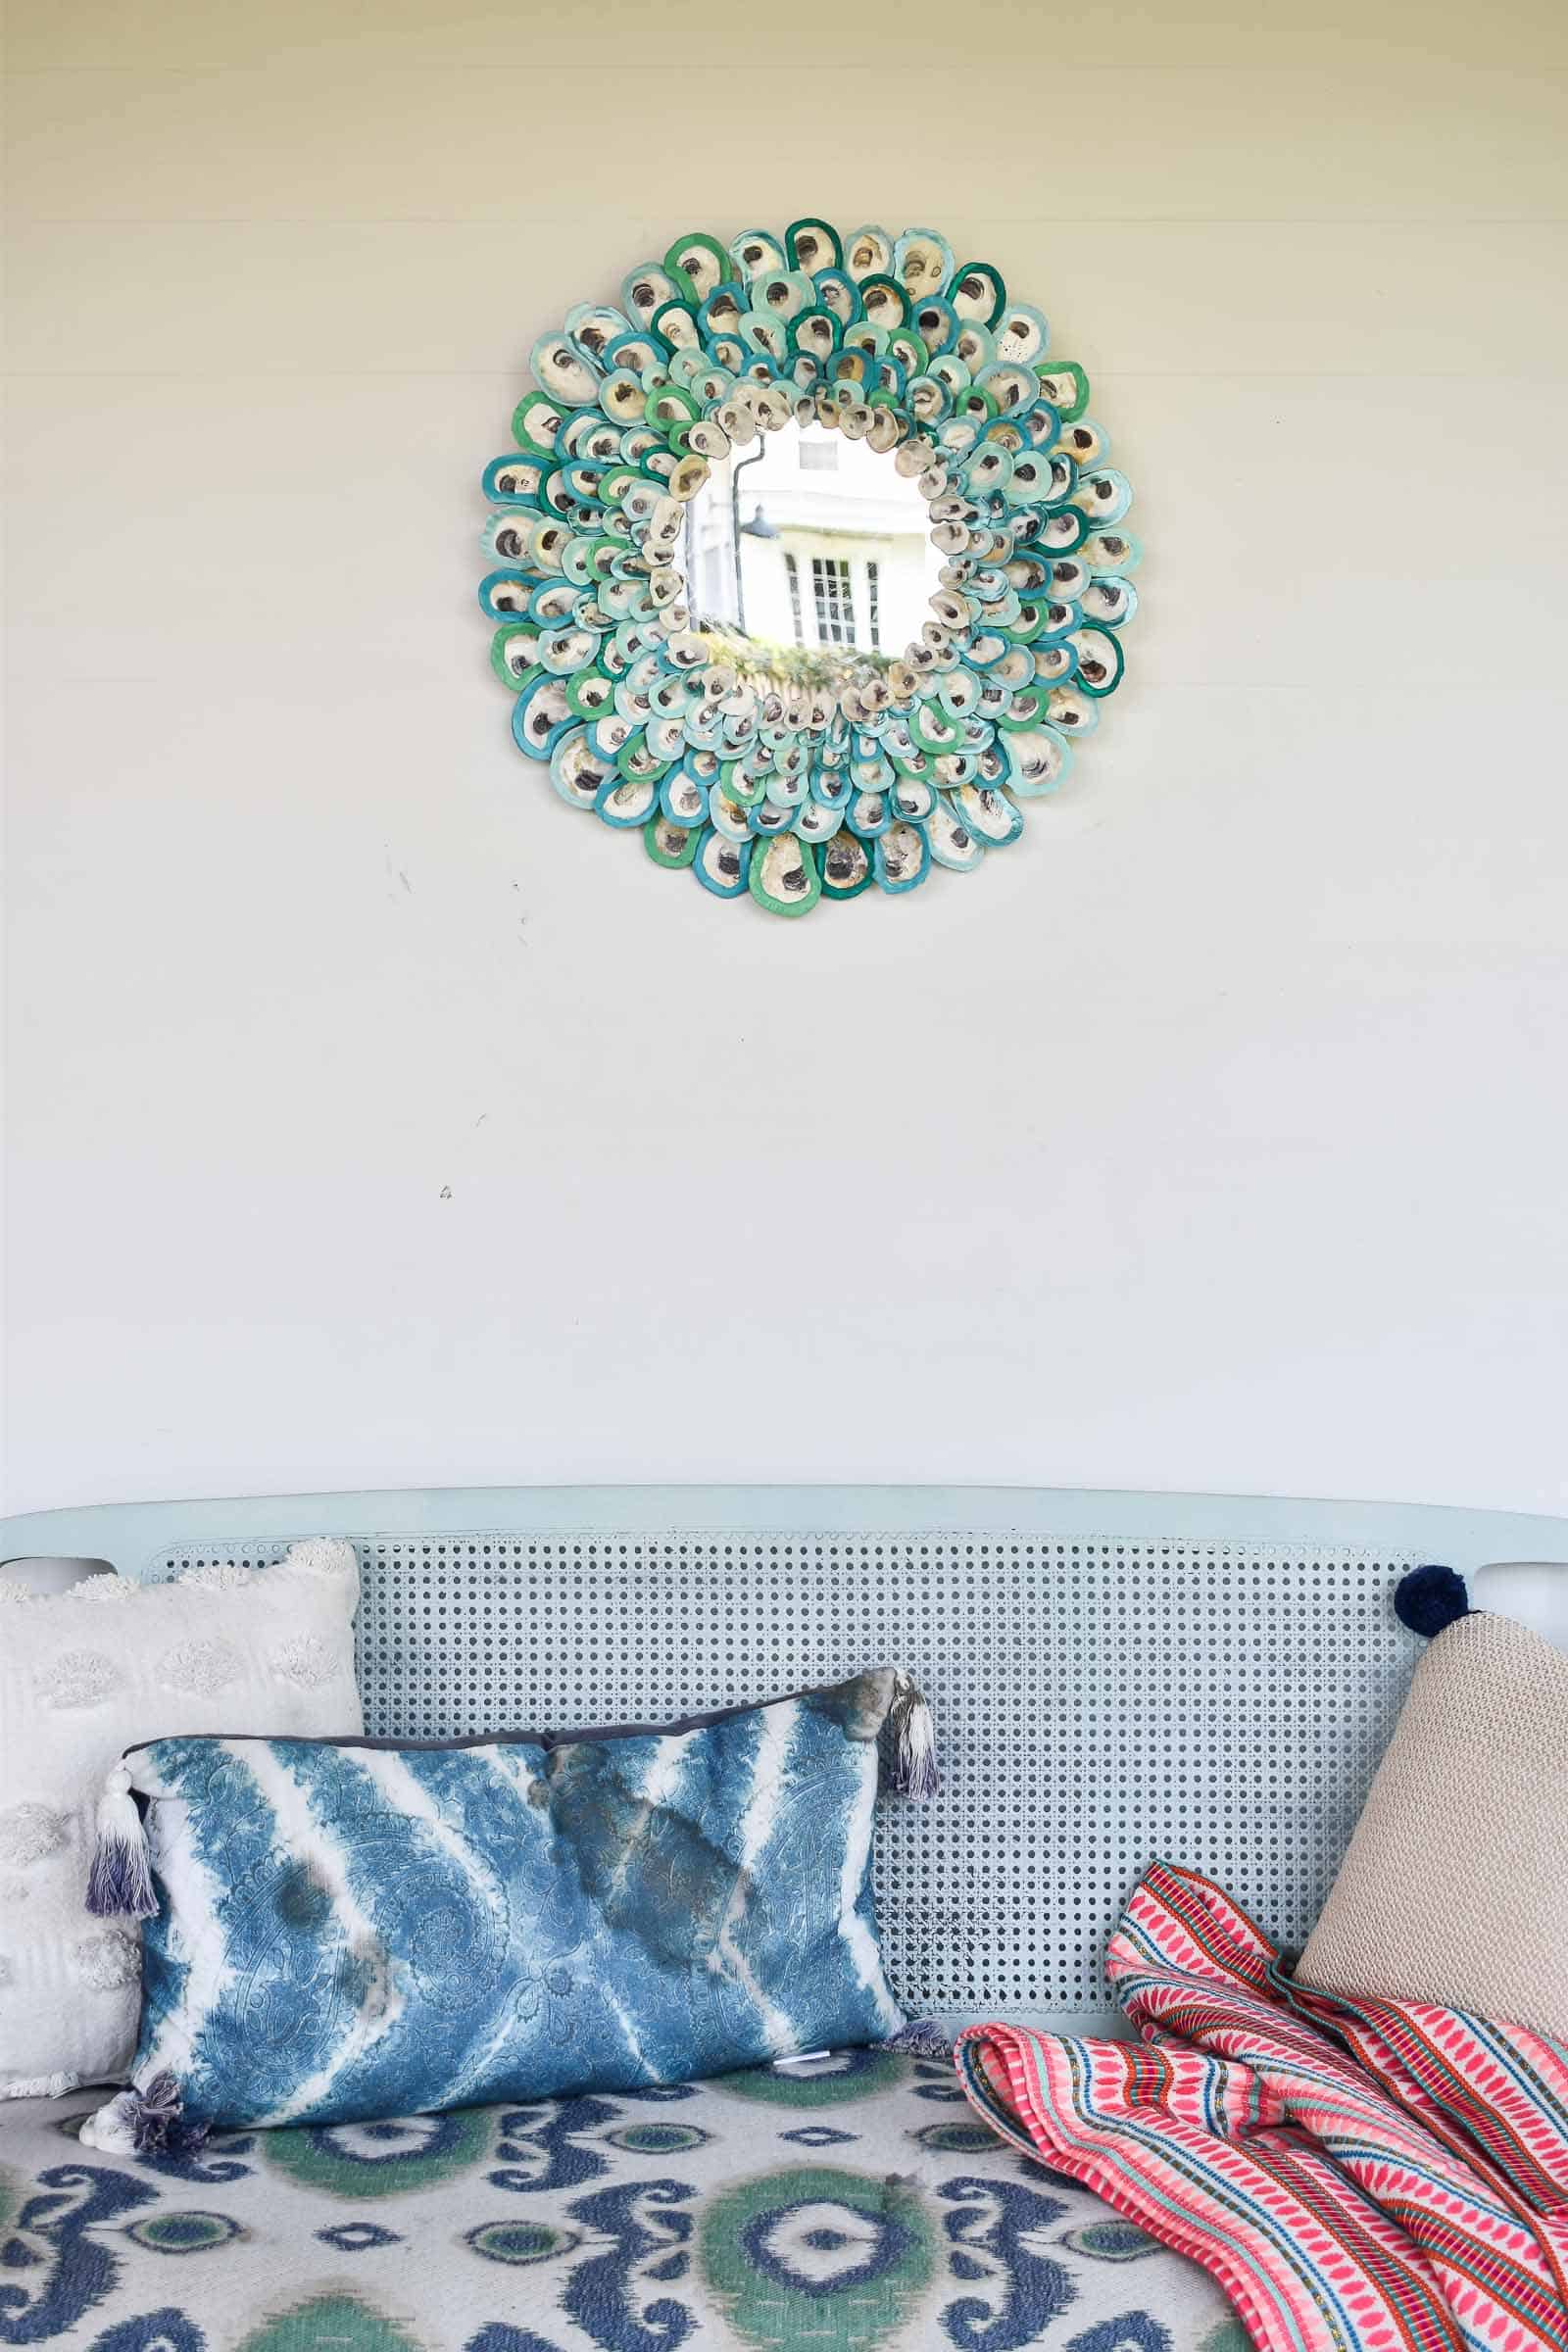
Continue adding rings of shells until you’ve covered the entire mirror. I decided to add one last ring of UNPAINTED tiny shells gluing them right on top of the mirror itself to help conceal the edge of the mirror.

last ring of the oyster shell mirror

row of unpainted oyster shells on mirror

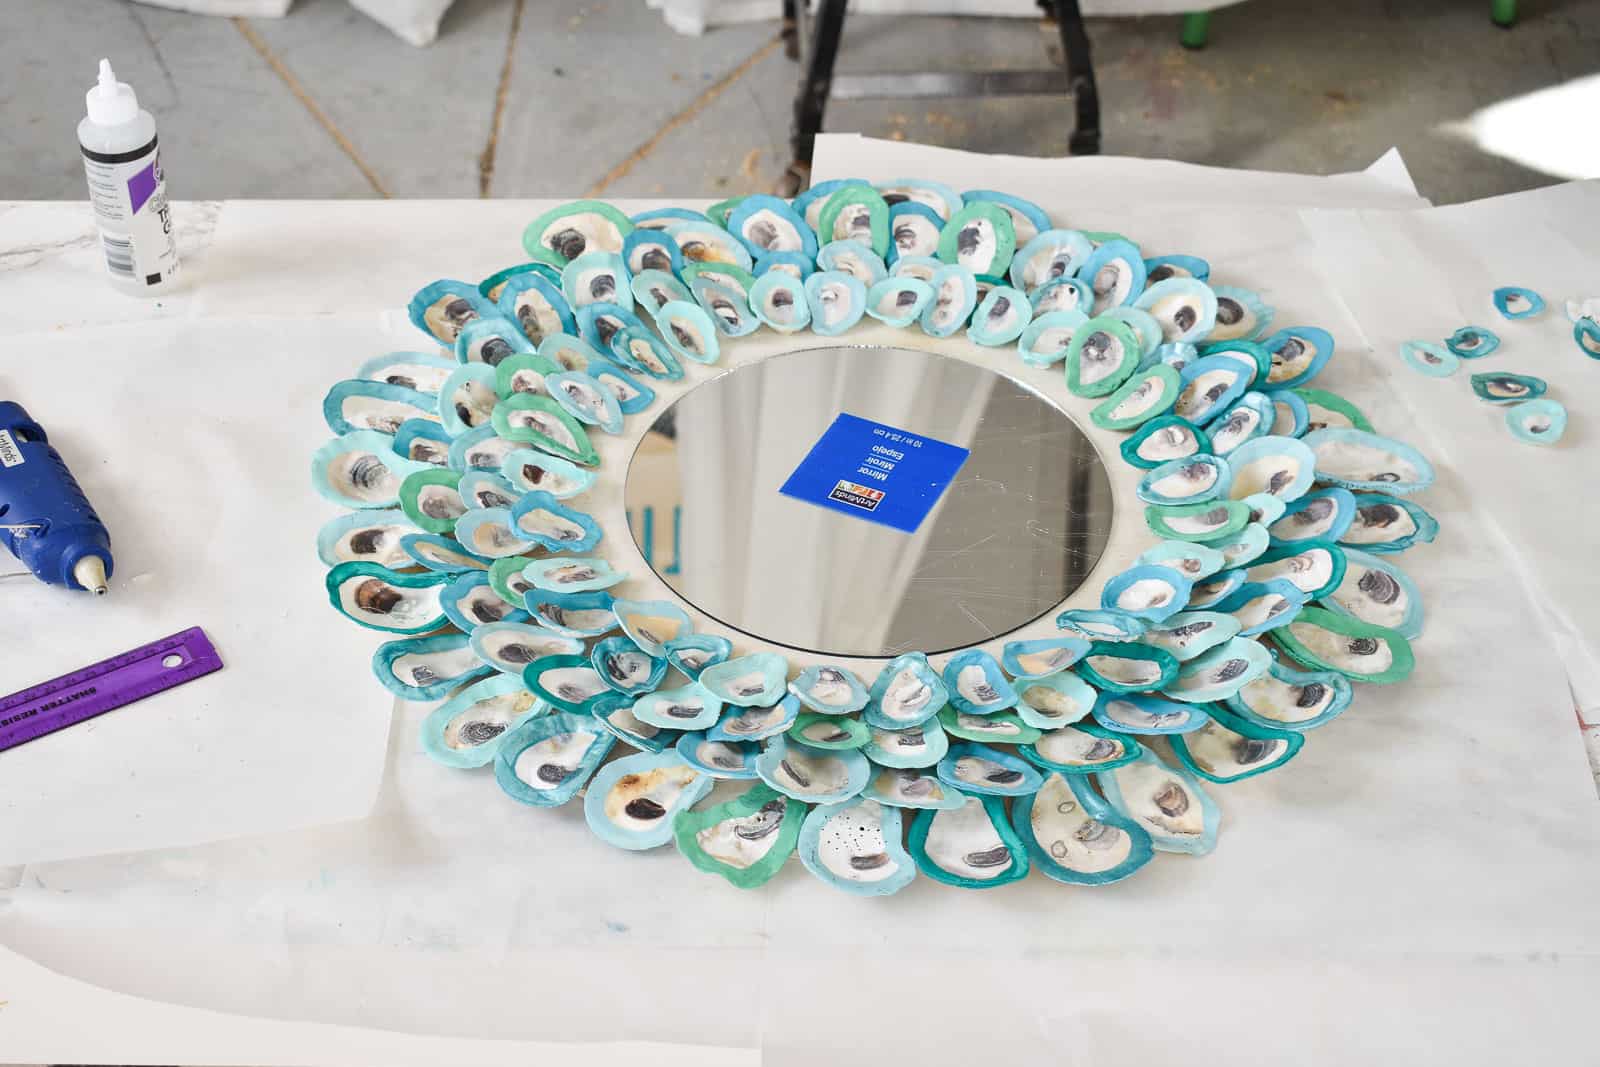
Tip. Because you’re working with so much hot glue, there’s a pretty good change you’ll have lots of those whispy hot glue strands all over the mirror. Run a heat gun or a hot hair dryer over the surface and those strands will disappear… poof.

whisps of hot glue over the mirror

Step 5. Add the Hanger

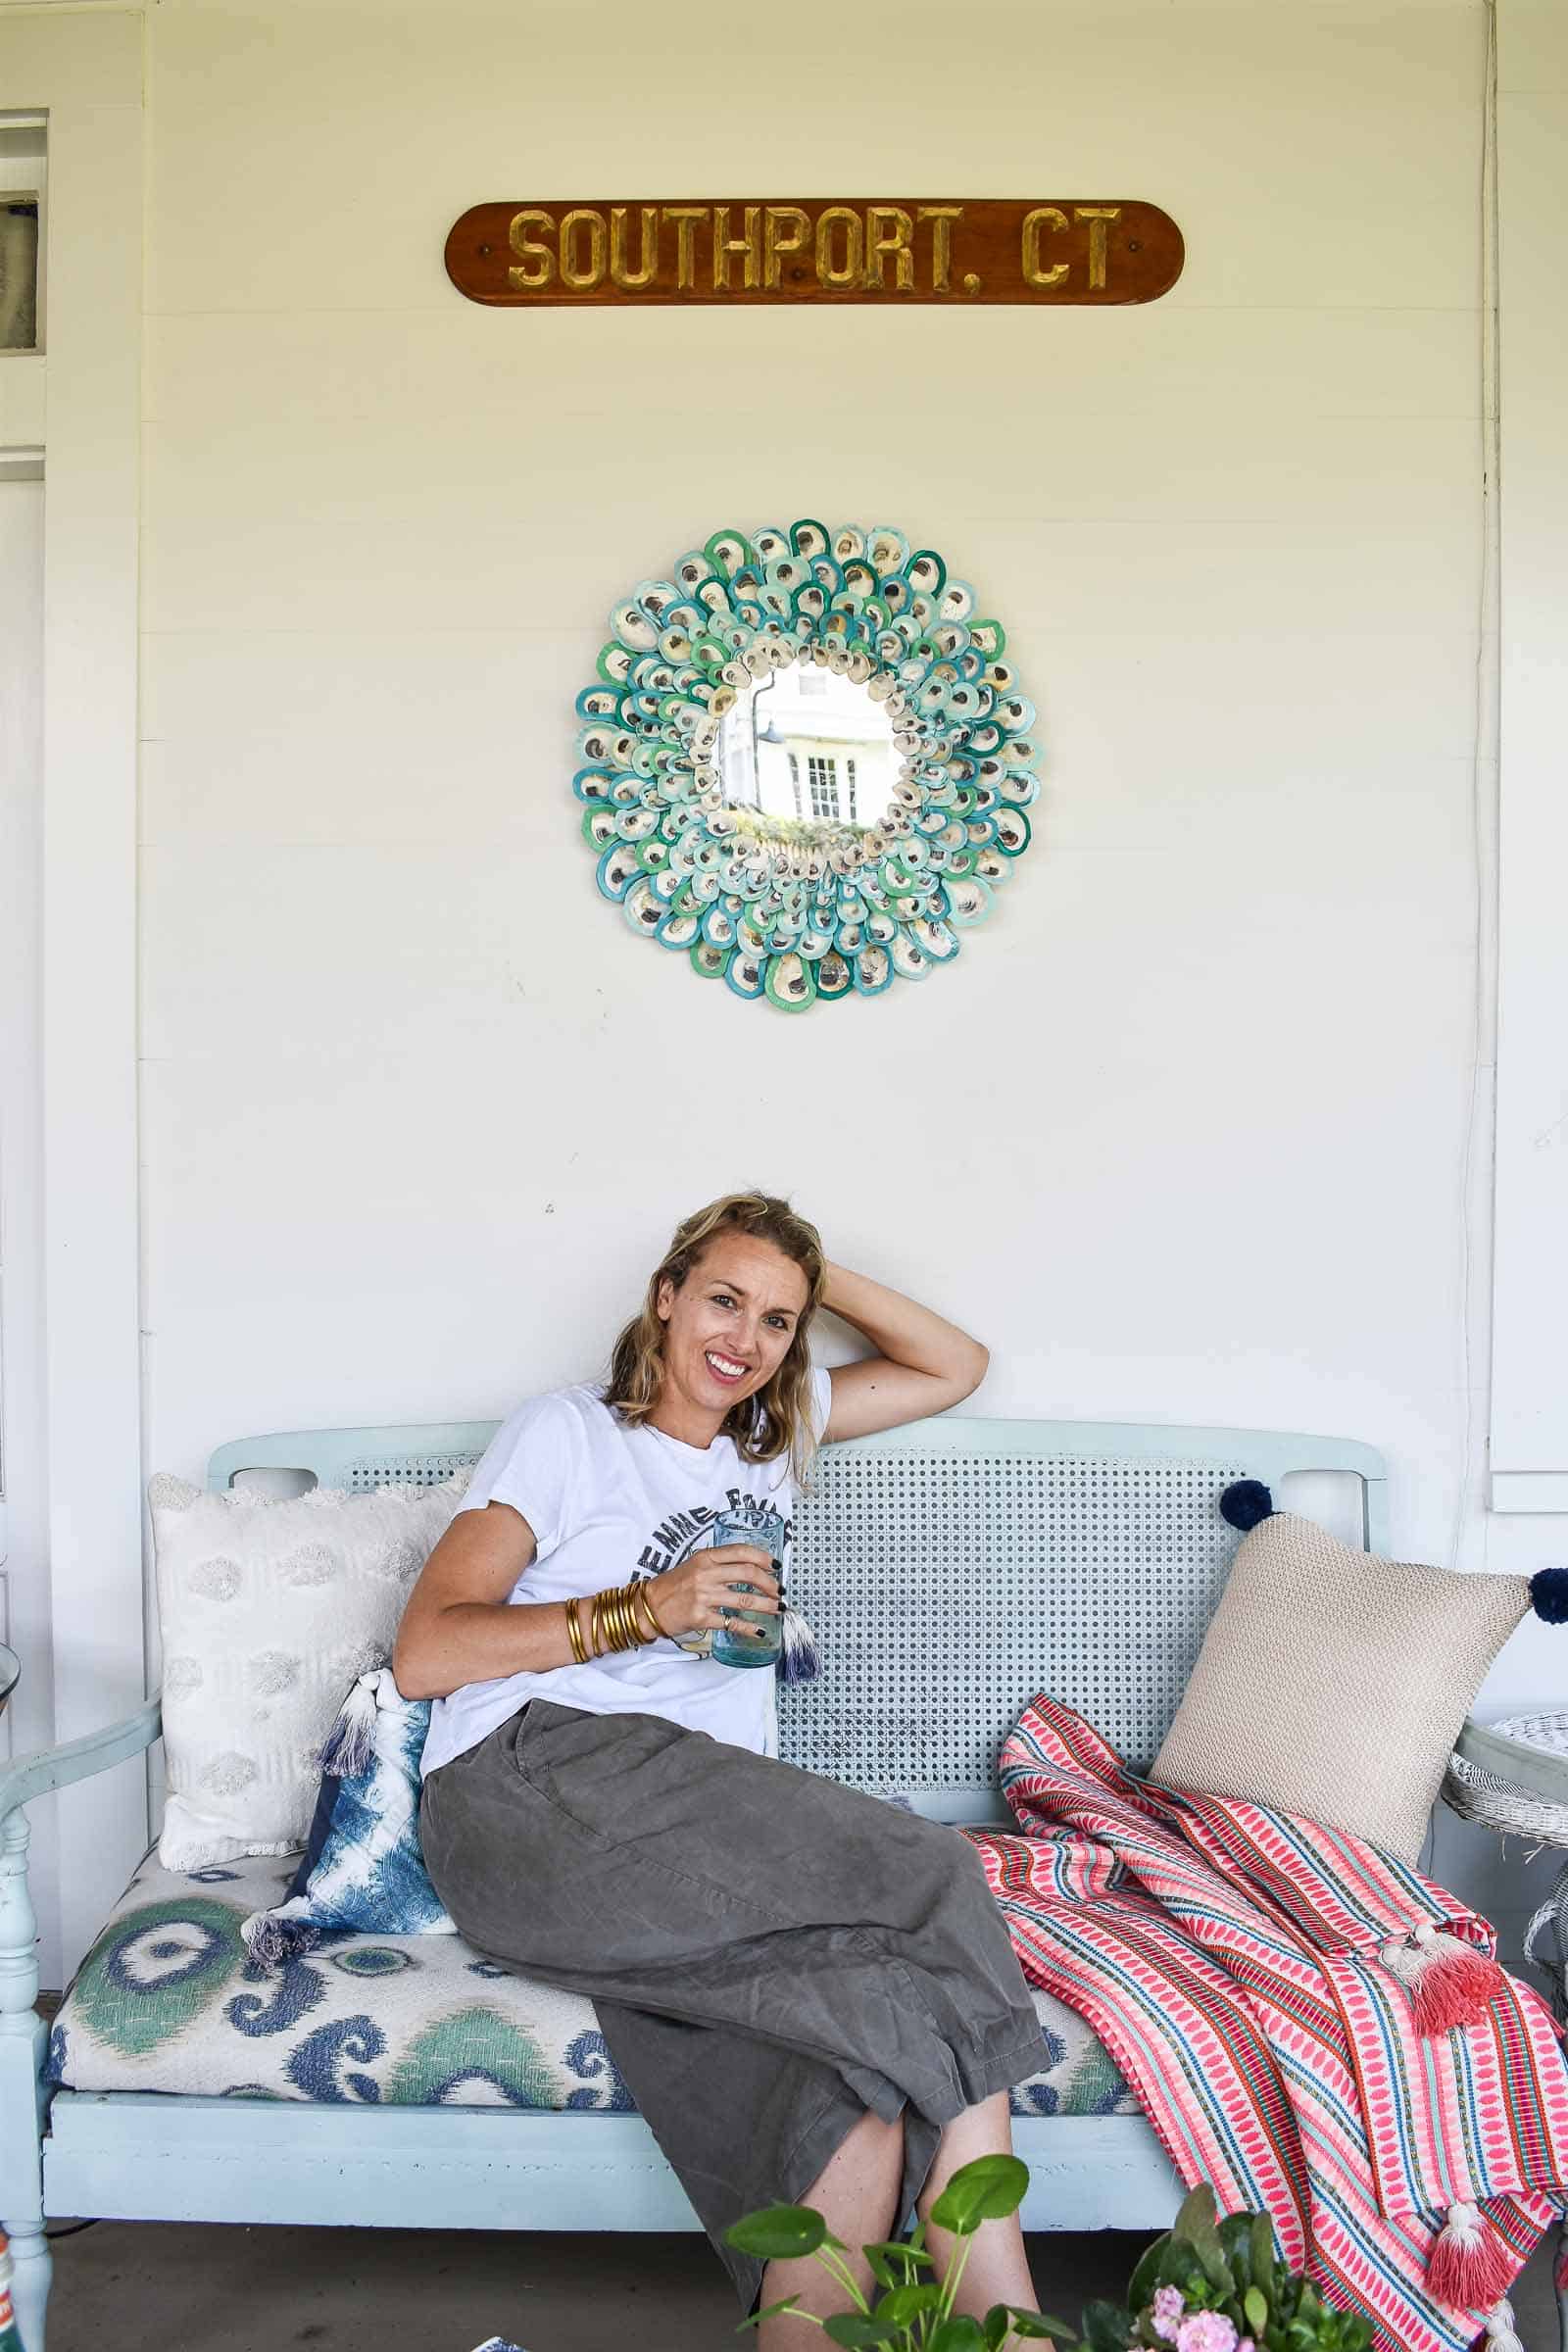
In hindsight, I might have added this first so I didn’t have to juggle the mirror with the shells, but… I also liked having the mirror lie flat when I was assembling so I’m not 100% sure. I flipped over the mirror and rested it on a can of paint. I took a length of scrap wood (maybe 10 inches?) and screwed in 2 D-rings. Then I used wood glue to attach this to the back of the mirror. My plywood was super thin and the shells are fairly light so I think this will be plenty sturdy. I ran picture wire between the D-rings and hung on our porch!

attaching the hanger to the back of the mirror

Obviously this mirror needs to go somewhere out of the way so it won’t get bumped into. I’m not sure if it will stay out here on the porch, but the colors are PERFECT. At the very least, it looks amazing in photos! I’m hopeful that it will hold up over time, but I’ll update this post if something happens and the glue doesn’t hold.

how to make a colorful oyster shell mirror how to make a colorful oyster shell mirror how to make a colorful oyster shell mirror

oyster shell mirror tutorial

Do you prefer a video? Well I got one! Click below to see it all come together!

pin this image to pinterest

colorful oyster shell mirror


XO Charlotte

4 Comments · Wall Decor

Comments

  1. Diane says

    August 16, 2018 at 9:27 pm

    I adore this!!

    Reply
    • Charlotte Smith says

      August 16, 2018 at 10:45 pm

      Thanks, Diane! It was a really fun project!

      Reply
  2. Claire says

    August 21, 2018 at 6:14 am

    this looks gorgeous, I love how you added colour.

    Reply
    • Charlotte Smith says

      August 23, 2018 at 11:13 pm

      Thanks, Claire! I can’t resist adding color. 🙂

      Reply

Leave a Reply to Charlotte Smith Cancel reply

Your email address will not be published. Required fields are marked *

*It's not you, it's me... don't mind the CAPS LOCK!
  • Bloglovin
  • Facebook
  • Instagram
  • Pinterest
  • Twitter
  • YouTube

SEARCH

Lover of color, wrangler of chaos, thrifter of all the things.

head-shot-1 Hi, I'm Charlotte! I'm fixing up our 100 year old house and artfully hoarding armchairs in the garage. I love color. I love flea markets. I love a little mess. My days are spent writing, painting, sanding, laughing and negotiating with our 5 kids. You can read more about us here
amazon-shop

SUBSCRIBE

Sign up for my newsletter and get access to my super duper secret and exclusive FB Group... I'll answer questions, share tips, post funny memes. It'll be awesome. (If you're not on FB- hi Dad- I'll still answer any design or thrifting questions... email me!)

Recent Posts

Plans for Our Homework Station

Plans for Our Homework Station

Room Design Dreams

Room Design Dreams

My Renovation Binder

My Renovation Binder

Mason Jar Butterfly Terrarium

Mason Jar Butterfly Terrarium

ach-popular-posts
ach-house-tour

WHAT TO WATCH

AS SEEN ON

rr-logo-1 sidebar-as-seen-on-2 sidebar-as-seen-on-1-1 bh-sidebar-1 design-sponge-1 houzz-sidebar-1 mass-appeal fmf-sidebar-1

COPYRIGHT & USE POLICY

All images and text shared on this site are the property of At Charlotte's House unless stated otherwise... and I'm SO thrilled that you're here visiting. I'm delighted for you to Pin or Stumble or Share or Tweet to your hearts delight providing all links are directly to "At Charlotte's House" (not "source" or "photo credit", etc.). If you are a blog or an individual and would like to mention a post of mine please only use a SINGLE image and link back to my original post. I invite brands to contact me directly for image-use terms. Do not alter, crop, edit or add/ remove watermarks from my images. I do not accept guest posts of any kind at this time. If you have any questions, please contact me. For more information, see my full disclosure and privacy policy.

@AtCharlottesHouse

  • If theres something we love in the Smith House its
  • Kids are home for the long weekend Im currently looking
  • I have done zero repeat ZERO for Valentines day this
  • Some days you just have to reach for the bag
  • If you scroll through the list of people you follow

Copyright © 2019 · Simply Pro Theme by Bloom Blog Shop.